Tuesday, August 20, 2013
Top 20 IT companies in Nepal
# Name #URL #Start Year # of Employees
1 D2HawkeyeServices Pvt. Ltd. http://www.d2hawkeyeservices.com 2003 260
2 LinkTree Pvt. Ltd. http://www.linktree.biz 2006 200
3 HWB Nepal Private Limited, Nepal http://www.itoffshorenepal.com 2006 100
4 Javra Software Nepal Pvt. Ltd. http://outsourcing.javra.com 2005 80
5 Nepasoft http://www.nepasoft.com 1994 80
6 Arhant Solutions http://www.arhant.com 2006/07 55
7 Professional Computer System Pvt. Ltd. http://www.pcs.com.np 1988 50
8 ServingMinds http://www.servingminds.com.np 50
9 UBA-Solutions http://uba-solutions.com 2006 50
10 Yomari Pvt. Ltd. http://www.yomari.com.np 1997 50
11 Worldlink Technologies Pvt. Ltd. http://www.wlinktech.com 40
12 IT@Himalaya Pvt. Ltd http://www.procit.com 2001 30
13 Websearch http://websearchpro.net 2005 30
14 Hitech Solution & Services Pvt. Ltd. http://www.hitechnepal.com.np 2003 27
15 Deerwalk Pvt. Ltd. http://deerwalk.com 2009 25
16 Pioneer Solutions Nepal Pvt. Ltd. http://www.pioneersolutions.us 2009 25
17 F1Soft International Pvt. Limited http://www.f1soft.com 2004 22
18 Elvsys http://www.elvsys.com 2006/07 20
19 MountDigit http://www.mountdigit.com 2001 18
20 Doodle Creation Pvt. Ltd http://www.doodlecreation.com 2007 15
Monday, August 19, 2013
Windows XP: \windows\system32\config\system file missing or corrupt
Try booting up with the original win xp installation disk and choose repair upon bootup.
This should fix most problems with corrupt/missing system files. If that does not work, you may be stuck with reloading completely.
If you have no bootable XP media (or are not sure what you have) create a bootable XP Recovery Console CD and be sure.
This is not the same as any recovery disks that might have come with a store bought system.
You can make a bootable Recovery Console CD by downloading an ISO file and burning it to a CD.
The bootable ISO image file you need to download is called:
xp_rec_con.iso
Download the ISO file from here:
http://www.mediafire.com/?ueyyzfymmig
Use a new CD and this free and easy program to burn your ISO file and create your bootable CD:
http://www.imgburn.com/
Here are some instructions for ImgBurn:
http://forum.imgburn.com/index.php?showtopic=61
It would be a good idea to test your bootable CD on a computer that is working.
You may need to adjust the computer BIOS settings to use the CD ROM drive as the first boot device instead of the hard disk. These adjustments are made before Windows tries to load. If you miss it, you will have to reboot the system again.
When you boot on the CD, follow the prompts:
Press any key to boot from CD...
The Windows Setup... will proceed.
Press 'R' to enter the Recovery Console.
Select the installation you want to access (usually 1: C:\WINDOWS)
You may be asked to enter the Administrator password (usually empty).
You should be in the C:\WINDOWS folder. This is the same as the
C:\WINDOWS folder you see in explorer.
The Recovery Console allows basic file commands like: copy, rename, replace, delete, cd, chkdsk, fixboot, fixmbr, etc.
For a list of Recovery Console commands, enter help at the prompt or read about the XP Recovery Console here:
http://www.microsoft.com/resources/documentation/windows/xp/all/proddocs/en-us/recovery_console_cmds.mspx?mfr=true
A good idea before starting things is to first verify the integrity of your file system using the chkdsk command.
From the command prompt window run the chkdsk command on the drive where Windows is installed to try to repair any problems on the afflicted drive.
Running chkdsk is fine even if it doesn't find any problems. It will not hurt anything to run it.
Assuming your boot drive is C, run the following command:
chkdsk C: /r
Let chkdsk finish and correct any problems it might find.
It may take a long time for chkdsk to complete or it may appear to be 'stuck'. Be patient. If the HDD light is still flashing, chkdsk is doing something. Keep an eye on the percentage amount to be sure it is still making progress. It may even appear to go backwards sometimes.
You should run chkdsk /r again until it finds no errors to correct.
Remove the CD and type 'exit' to leave the RC and restart the computer.
You do not have to adjust the BIOS again to boot on the HDD since the CD will not be present.
Configuring the Outook Mail settings in Nepal.
Section 1.
i. Open Microsoft Office Outlook from All Programs.
ii. Click on Tool Menu from menu bar.
i. Open Microsoft Office Outlook from All Programs.
ii. Click on Tool Menu from menu bar.
iii. Click on Account Setting.
iv. Click on New Email.
v. Select "Microsoft Exchange,POP3,IMAP,or HTTP."
vi. Next
vii. Select "Manually configere Server Settings or additional server types"
viii.Next
ix. Select "Internet E-mail."
x. Next
xi. Add new E-mail Account Window appear.
( Now follow the other step of setting according to the mail services that you used)
For Mercantile Mail Service
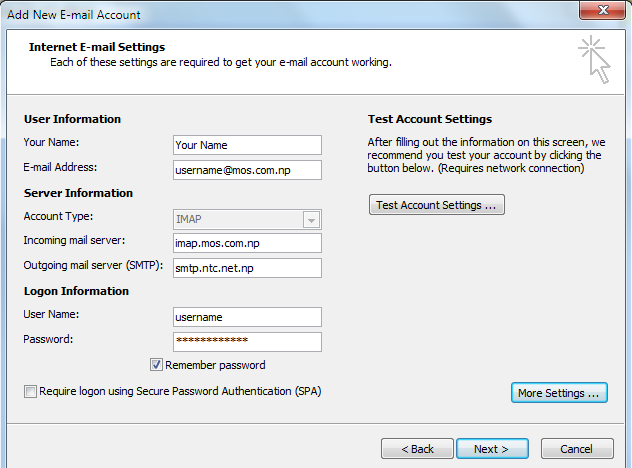 Note: In Outgoing Mail Server (smtp) will be depend on the Internet Service that you used. smtp.ntc.net.np is for Nepal Telecome and smtp.worldlink.com.np for Worldlink.
If you used outlook Express then visit on this Link Mercantile Outlook Express Setting.
For Mercantile Mail Service
If you used outlook Express then visit on this Link Mercantile Outlook Express Setting.
Friday, August 16, 2013
Configuring the Outook Gmail settings.
You can configure Outlook to handle your Gmail account as a POP3 or as an IMAP account. Depending on your choice, you have to enable the related account option in your Gmail account (Gmail Settings -> Forwarding and POP/IMAP).
Below, we will detail how to setup Microsoft Office Outlook 2000 to 2010 to send, receive and store email messages for a Gmail address. Before getting started, please make sure you know your Gmail email address and your Gmail password.
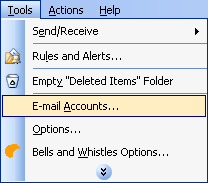
Start Outlook: from the main Outlook window, go to Tools -> Email Accounts.
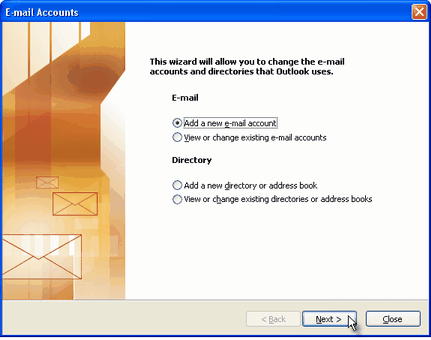
On the Outlook popup window, select to "Add a new e-mail account" and click on Next.
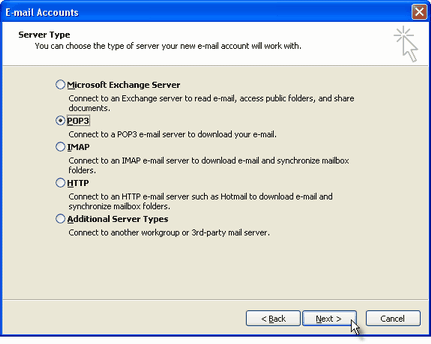
On the server type step, select POP3 or IMAP (depending on your needs) for the Outlook email account type, then click on Next. There is no need to select the IMAP type, because the Gmail web based account will anyway keep a copy of all emails, just like an IMAP account would do.
On the next screen, you will have to specify your Outlook Gmail settings, such as your Gmail username and password, Gmail server addresses, Gmail server ports and Outlook Gmail display name.
On the User Information section, enter your Name (it can be anything, but remember this is going to be the name/text that people will see when you will send them an email via your Outlook Gmail account) and your Gmail email address.
On the Server Information section, enter the Google Gmail servers:
POP Gmail servers for Outlook:
- Incoming mail server: pop.gmail.com
- Outgoing mail server: smtp.gmail.com.
IMAP Gmail server for Outlook:
- Incoming mail server: imap.gmail.com
- Outgoing mail server: smtp.gmail.com.
As an alternative, you may setup any other outgoing mail server that you have access to, such as your ISP's SMTP server or your own hosted outgoing server. However, if you setup a 3rd party outgoing mail server, you will not have access to sent emails via your web based Gmail account panel.
On the Logon Information section, enter your Gmail User Name (which is the same as your Gmail email address) and your Gmail password. Tick the box "Remember password" in order to make Outlook to store the Gmail password, so it will not ask you about it every time when Outlook will send/receive emails for the Gmail account.
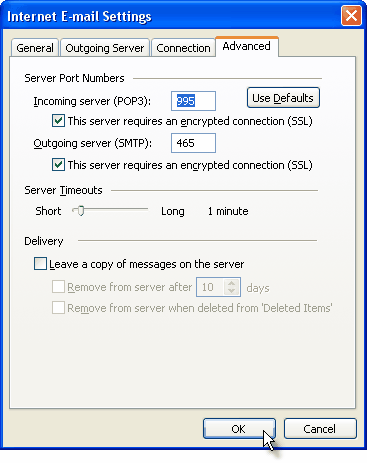
Click on the "More Settings" button and go to the "Advanced" window tab.
If you use Gmail as a POP Outlook account:
- On the "Incoming server (POP3)" field, enter 995 and mark the box "This server requires an encrypted connection (SSL)";
- On the "Outgoing server (SMTP)" field, enter 465 and mark the box "This server requires an encrypted connection (SSL)".
If you use Gmail as an IMAP Outlook account:
- On the "Incoming server (IMAP)" field, enter 993 and mark the box "This server requires an encrypted connection (SSL)";
- On the "Outgoing server (SMTP)" field, enter 587 and mark the box "This server requires an encrypted connection (TLS)".
For both POP and IMAP, you also have to enable the option "My outgoing mail server requires authentication" from the Outgoing Server tab.
You can also change the server timeouts period: this defines the time interval for which Outlook will wait to establish a Gmail connection, before triggering a connection error. The slower your Internet connection is, the greater period you should put.
The "Delivery" options are not important for an Outlook Gmail account: no matter what you would change here, Gmail will always keep a copy of each email on the Gmail server.
When you are done setting up your Outlook Gmail advanced settings, click on OK to return to the Outlook Gmail account window.

To verify your Outlook Gmail setup, click on the "Test Account Settings" button: this will make Outlook to attempt to login to your Gmail account and to send & receive an Outlook test email. If the test will succeed, you will notice the test email in your Outlook Inbox folder. If the test fails, Outlook will prompt you with the error messages - most likely, you didn't setup the correct server settings or the Gmail password is wrong.
Tuesday, August 6, 2013
How to: Crack WPA/WPA2 with Reaver
There is a weakness in WPA that allows for attacker to brute force against the Wifi Protected Setup Pins and recover an access points password within 4-10 hours. The tool we are going to be using with this method is called Reaver. This method may only be used if the WiFi network is using PSK (Public Shared Key) as the authentication method.
In order to do this attack, you will require a wireless adapter that can be put into monitor mode. I recommend the Realtek RTL8187. Alfa cards will also do the job and you can find either one of these online for pretty cheap.
Step 1: Open a terminal window and find your wireless adapter.
Type in airmon-ng and this will display the wireless adapters you have connected.
Step 2: Put your Wireless Adapter into monitor mode.
You can do this by typing: airmon-ng start wlan0
(Yours may be different than wlan0, make sure to get the interface from the first step.)
Monitor mode basically lets your wireless adapter monitor all traffic received.
After this is complete, you will see at the bottom: “monitor mode enabled on mon0″. This ensures that your Wireless Adapter has been set to monitor mode.
Step 3: Determine which Access Point to attack.
In this step we will find out the BSSID of the access point you want to attack. This is the unique identifier for the access point.
Type: airodump-ng mon0
This will list all of the access points that are in your area and give their BSSIDs:
For this tutorial, I will be using that top network “linksys”
Under “Auth” you will see PSK (Public Shared Key). This cracking process will only work if the network is using PSK.
Take note of the BSSID and the Channel number.
Step 4: Let’s get cracking
We will now use Reaver to target the specific BSSID and Channel number to retrieve the password from the router.
The command you will type in is:
reaver -i mon0 -c 6 -b 80:96:B1:AA:A3:92 -vv
The 6 and the 80:96:B1:AA:A3:92 will be different for you of course, depending on the channel and BSSID you are targeting.
-i = The interface you wish to use.
-c = The channel number
-b = The BSSID of the access point.
-vv = Very verbose, it gives detailed information along the way but it is not required.
As you can see, Reaver starts by trying pin 12345670 against the Public Shared Key. It will keep trying pins until the correct one is found. When it is found, the access points password will be shown to you! This process can take roughly 4-10 hours.
Sunday, August 4, 2013
Default Router IP Addresses
Router Manufacturers Default IP Addresses
3Com 192.168.1.1
Apple 10.0.1.1
Asus 192.168.1.1, 192.168.1.220
Belkin 192.168.2.1, 10.1.1.1
Buffalo 192.168.11.1
Dell 192.168.1.1
D-Link 192.168.0.1, 0.30, 0.50, 1.1, 10.1.1.1
Linksys 192.168.0.1, 1.1
Microsoft 192.168.2.1
Motorola 192.168.10.1, 20.1, 30.1, 62.1, 100.1, 102.1, 1.254
MSI 192.168.1.254
Netgear 192.168.0.1, 0.227
Senao 192.168.0.1
SpeedTouch 10.0.0.138, 192.168.1.254
Trendnet 192.168.0.1, 1.1, 2.1, 10.1,
U.S. Robotics 192.168.1.1, 2.1, 123.254
Zyxel 192.168.1.1, 2.1, 4.1, 10.1, 1.254, 10.0.0.2, 0.138
TP-Link 192.168.1.1
2wire 192.168.1.254,172.16.0.1
Tenda 192.168.1.1,0.1,0.254
Subscribe to:
Posts (Atom)